
How to make beautiful traditional rainbow lace Ñandutí accessories
- Date created:
- Update date:
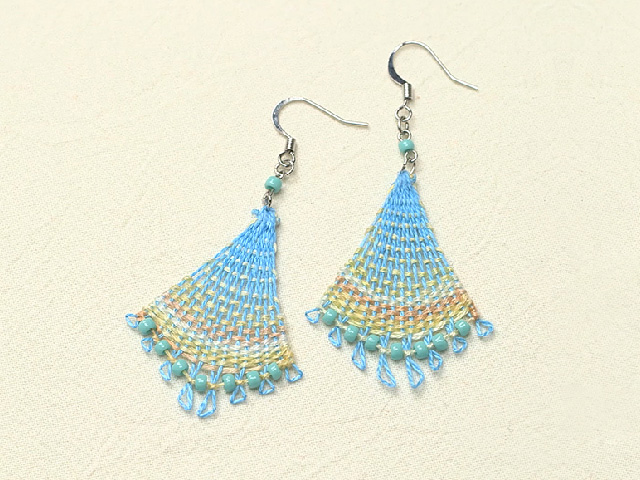
Ñandutí is a traditional lace embroidery technique from Paraguay in South America. While it may look difficult at first glance, with practice, you can create accessories like these. This time, we'll show you the detailed steps for making Ñandutí.
◇Materials and tools required
Please choose your preferred color of thread.

·cloth
Embroidery thread
Cross stitch needle
Accessory findings
Earring or clip-on earring findings, jump rings, 9-pins
・ビーズ
・Wooden frame
Thick thread and needle, craft glue, brush, etc.
◇ Assemble the wooden frame and stretch the fabric over it.
The key is to stretch the fabric taut and without any sagging.


Apply glue firmly to the indentations and then assemble the wooden frame.

Stretch the white cloth with thick thread.


Make sure the fabric is stretched taut.

Fold the edges of the fabric in half and sew them. This will prevent them from fraying if you pull on them during the construction process.
◇Transfer the design.


Transfer the design onto the fabric using a pencil or similar tool.
◇We will create the base using the warp threads.

Tie a knot at one end of the thread, pick up the end at the three marked points in the design, and bring it out from the other end at the same point.

Insert the thread below the knot, splitting it as you go.

Scoop up the same spot again. This time, leave about 1 cm of the knotted end.

Insert the thread below the knot once more.

Pull the thread upwards firmly so that the thread you are pulling on top is in the center.


Insert the needle from the rightmost point and bring the thread out from the adjacent point.

Pass the thread under the thread below and insert it into the next point. Repeat this process.

The base for the warp threads is complete.
◇The weft threads are passed through the base.
Be careful to pick up the thread every other row.

Starting from the left edge, pick up every other thread of the base with the needle, and pass the weft thread from left to right.

Once you've threaded the yarn through to the right, pull the weft thread tightly.

Next, pick up the threads that were not picked up in the first row, moving from right to left.

To reiterate, from the second row onwards, thread the yarn without pulling it too tightly or too loosely, and you'll get a nice finish.

On the last row, thread the beads.

Secure the beads with a knot.

Pulling to the right, then to the left, will create a neat knot.

Repeat the process of threading the beads, and your diamond-shaped motif will be complete.
◇Finishing

Apply diluted craft glue or laundry starch to the front side using a brush. Be careful not to get glue on the beads, applying it right up to the edges of the beads. For a clean finish, lightly dab the glue on with the brush.

Apply glue from the back side as well. Make sure to firmly attach the entire piece of fabric to the back side.

After applying adhesive to both sides, let it air dry or use a hairdryer to dry it thoroughly.
◇Once dry, cut along the seams.

Once the glue is dry, use scissors from the back to cut along the edge of the seam.

Gently peel off the fabric attached to the motif.

Trim any exposed weft threads on the back side to make them less noticeable.

Finally, attach the accessory findings.

The "diamond-shaped Ñandutí with beads" is complete.
The delicate threads that are linked together are eye-catching.
As seen in this piece, using mixed-color yarn allows you to enjoy gradients. It's lovely not only as an accessory but also as a decorative motif. The possibilities for variations are endless depending on the yarn and parts you use.
The Couturier blog features a variety of crafting tips and lots of helpful information. Don't miss the Couturier shop, where you can buy crafting kits, and our official social media accounts!
▽Click here for a list of embroidery articles
▽Click here for a list of embroidery kits.
▽Click here for a list of accessory kits.
▽Click here for the Couturier Shop
The products featured in this article are listed here.

Paraguayan lace embroidery: Ñandutí accessory workshop
This accessory kit lets you experience "Ñandutí," a lace embroidery technique from Paraguay, South America. From the more than 350 types of motifs available, we've selected easy-to-stitch patterns such as diamonds (rombo) and leaves (oja), perfect for beginners. Using a special wooden frame, you'll be captivated by the unique technique of weaving motifs together like a miniature textile, and the charm of the colorful lace.
SHARE


Articles I recently read

If you feel like doing some handicrafts (handmade crafts),
To the Couturier Shop

Shopping
Once you get hooked, you'll be completely engrossed!
These kits are long-selling and popular items at Couturier. From knitting and joining pieces to creating and wearing them, and enjoying various arrangements, there's a wide selection of kits that will have you completely hooked.
Shopping
For those new to handmade crafts, click here.
We want many people to experience the joy of making things by hand. That's why we have a wide selection of beginner-friendly lesson kits in our "Basics for Beginners" series.
Shopping
お す す め コ ン テ ン ツ
Shop for craft and DIY kits and handmade goods here.

Shopping
編み物
I want to knit every day, I want to knit all year round.
Shopping
The sun
You're sure to find an embroidery design you want to try!

Shopping
Sashiko
Sashiko embroidery, popular for its traditional patterns and characters.

Shopping
Sewing
A collection of tips and solutions for sewing and sewing problems.
Shopping
Accessories
Handmade accessories
Shopping
Craft
Crafts, handcrafts that don't require needles and thread

Shopping
ミ ニ チ ュ ア
Small, cute, heart-fluttering miniatures

Shopping
Beginner kit
Learn to do it! Popular beginner kit

Shopping
Couturier Shop Site
Shopping
Sales campaign
Shopping
Beginner Knitting Lesson Kit
Shopping